考虑到 Chinajsdelivr 的审查限制,本文改用 vercel 加速 GitHub 图床访问,并通过仓库结构调整和 GitHub Action,兼容国内外分流加速策略,自动化完成分支同步。
之前的文章介绍了如何搭建图床和使用jsDelivr 加速图床图片访问。
使用PicGo + GitHub 搭建 Obsidian 图床
https://haoyep.com/posts/github-graph-beds/
通过 Cloudflare 和 JsDelivr 免费加速博客 GitHub 图床等静态资源
https://www.haoyep.com/posts/github-graph-beds-cdn/ Chinajsdelivr 项目的加速效果不错,但由于成本等因素,加速的图片偶发不可访问。且加速的图片要能经过国内审查,如果图床内有违规图片(如魔法上网等),整个 Github 仓库都会被 Chinajsdelivr ban 掉。我本人的图床仓库就在使用了约1个月的时间后被 ban 掉了。虽说可以向开发者写邮件申述,但我懒得整理、清理违规图片,而且这种命运掌握在别人手中的感觉不太好。
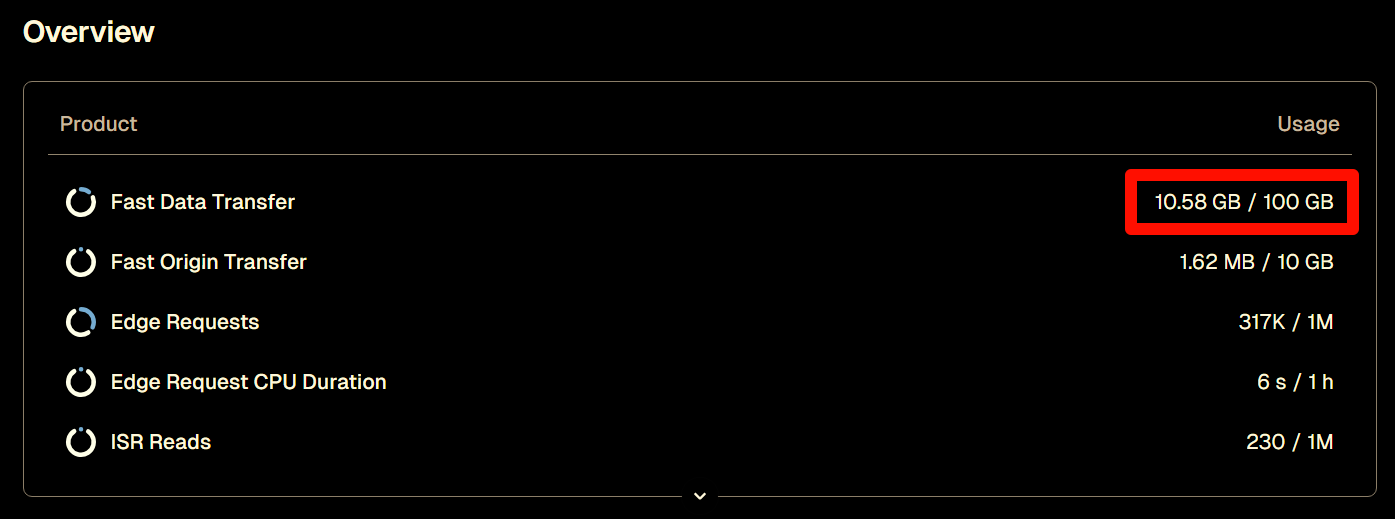
vercel 可以将 Github 仓库当做静态网站展示,仓库内的文件也会被当做网站的一部分,通过 vercel 的 CDN 进行加速。vercel 对每个账号的免费流量限制是 100GB/月。vercel流量限制
本人图床主要用于 Markdown 笔记和个人博客,基本没啥访问量,因此免费额度够用;且对加载速度要求不高,所以可以忍受 vercel CDN 的速度(总比直接访问 Github 仓库快)。
解决方案主要分为两方面:
将图床仓库改造,让 vercel 将其识别为静态网站资源目录。 兼容之前设计的国内外图床加速策略,国内访问走 vercel,国外走 jsdelivr 1 图床仓库改造
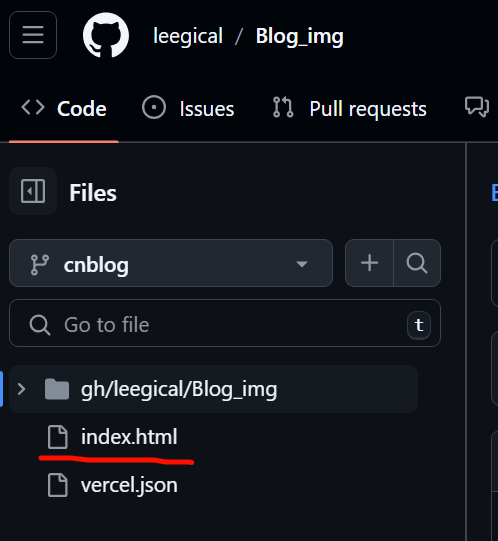
让 vercel 将仓库识别为静态网站的方法很简单,只需仓库根目录中存在index.html文件。你可以自定义一个简单的 html 文件,或者让 AI 帮你写一个。
例如,下面是一个用于展示当前时间的 html 代码。
 1
 2
 3
 4
 5
 6
 7
 8
 9
10
11
12
13
14
15
16
17
18
19
20
21
22
23
24
25
26
27
28
29
30
31
32
33
34
35
36
37
38
39
40
<!DOCTYPE html>
< html lang = "en" >
< head >
< meta charset = "UTF-8" >
< meta name = "viewport" content = "width=device-width, initial-scale=1.0" >
< title > 实时时钟</ title >
< style >
body {
display : flex ;
justify-content : center ;
align-items : center ;
height : 100 vh ;
margin : 0 ;
font-family : Arial , sans-serif ;
background-color : #f5f5f5 ;
}
# clock {
font-size : 48 px ; /* 增大字体大小 */
font-weight : bold ;
color : #333 ;
}
</ style >
< script >
function updateTime () {
var now = new Date (); // 获取当前时间
var hours = now . getHours (); // 小时
var minutes = now . getMinutes (); // 分钟
var seconds = now . getSeconds (); // 秒数
var formattedTime = hours + ':' +
( minutes < 10 ? '0' : '' ) + minutes + ':' +
( seconds < 10 ? '0' : '' ) + seconds ;
document . getElementById ( 'clock' ). textContent = formattedTime ;
}
setInterval ( updateTime , 1000 ); // 每1000毫秒(1秒)更新时间
</ script >
</ head >
< body onload = "updateTime()" >
< div id = "clock" ></ div > <!-- 时间显示的位置 -->
</ body >
</ html >
将上述代码复制并保存到 index.html 文件中,再将 index.html 文件上传到图床仓库根目录中。将 index.html 文件上传到图床仓库根目录中
假设使用图床仓库搭建的静态网站域名为 img.haoyep.com,图床仓库存在文件 cdnimg/test.png 图片,则可以使用链接 https://img.haoyep.com/cdnimg/test.png 来访问该图片。
2 兼容国内外加速策略
使用图床加速 文章中设计的国内外分流加速策略,国内访问 cdn.haoyep.com 会被重定向到 jsd.cdn.zzko.cn,国外访问被重定向到 cdn.jsdelivr.net。二者访问的 url 路径相同,仅是域名不同。
因此假设使用图床仓库搭建的静态网站域名为 img.haoyep.com,则期待实现的效果应当为:
1
2
3
4
5
6
7
8
# Github 图床图片对外展示链接
https://cdn.haoyep.com/gh/leegical/Blog_img/cdnimg/md_img.png

# cn请求将访问到
https://img.haoyep.com/gh/leegical/Blog_img/cdnimg/md_img.png

# 国外请求将访问到
https://cdn.jsdelivr.net/gh/leegical/Blog_img/cdnimg/md_img.png
但 vercel 静态网站的 url 路径就是仓库文件的实际路径。假设仓库cdnimg文件夹中有一个a.png文件,vercel和 jsdelivr 的访问链接分别为:
1
2
3
4
5
# vercel 的访问链接
https://img.haoyep.com/cdnimg/md_img.png

# jsdelivr 的访问链接
https://cdn.jsdelivr.net/gh/leegical/Blog_img/cdnimg/a.png
可以看到,由于 jsdelivr 的加速机制,它与 vercel 链接中的路径并不一致,多出了gh/用户名/仓库名。因此,需要调整仓库结构以兼容:
只需替换域名就能实现国内外分流 让 vercel 使用 jsdelivr 格式的路径访问到文件 2.1 仓库目录结构调整
实现思路为:
为图床仓库新建一个分支,假设新分支名为 vercelcdn 在新分支中,新建文件夹 gh/用户名/仓库名 将原图床中的所有文件拷贝到文件夹 gh/用户名/仓库名 中 clone 图床仓库到本地,进入图床仓库文件夹,执行以下命令。
记得将命令中的 用户名 和 仓库名 替换成你自己的。
1
2
3
4
# 创建新分支
git checkout -b vercelcdn
# 删除全部文件
rm -rf ./*
添加 index.html。在当前目录中新建文件,并粘贴代码。 1
2
3
# 新建 index.html文件
touch index.html
# 使用 nano/vim/vs code 编辑文件并粘贴代码
添加 vercel 缓存配置文件 touch vercel.json。复制下面的代码到 vercel.json 文件中并保存。 1
2
3
4
5
6
7
8
9
10
11
12
13
14
15
16
17
18
19
20
21
22
23
24
25
26
27
28
29
30
31
32
33
34
35
36
37
38
39
{
"headers" : [
{
"source" : "/sw.js" ,
"headers" : [
{
"key" : "Cache-Control" ,
"value" : "public, max-age=0, must-revalidate"
}
]
},
{
"source" : "/(.*).(jpe?g|png|ico|webp|svg|mp4|gif|xml|ttf|otf|woff2?)" ,
"headers" : [
{
"key" : "Cache-Control" ,
"value" : "public, max-age=31536000, immutable"
}
]
},
{
"source" : "(.*)" ,
"headers" : [
{
"key" : "Cache-Control" ,
"value" : "public, s-maxage=86400, max-age=86400"
},
{
"key" : "CDN-Cache-Control" ,
"value" : "max-age=86400"
},
{
"key" : "Vercel-CDN-Cache-Control" ,
"value" : "max-age=86400"
}
]
}
]
}
1
2
3
4
5
6
7
8
# 克隆图床仓库到新分支的新文件夹
git clone https://github.com/用户名/仓库名.git gh/用户名/仓库名
# 删除多余的 .git 文件夹
rm -rf ./gh/用户名/仓库名/.git
# 保存并提交到 Github 远程分支
git add .
git commit -m "初始化vercel分支内容"
git push --set-upstream origin/vercelcdn
2.2 部署到 vercel
打开 vercel ,使用图床仓库的 Github 账号登录。
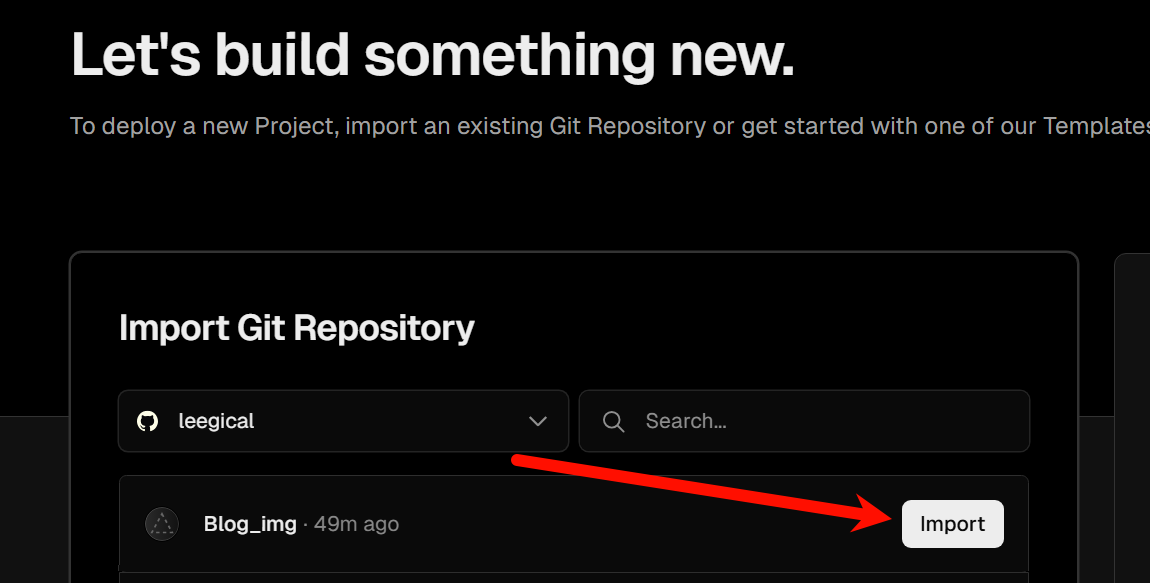
新建项目,选择图床仓库,点击 Import 使用图床仓库新建vercel项目
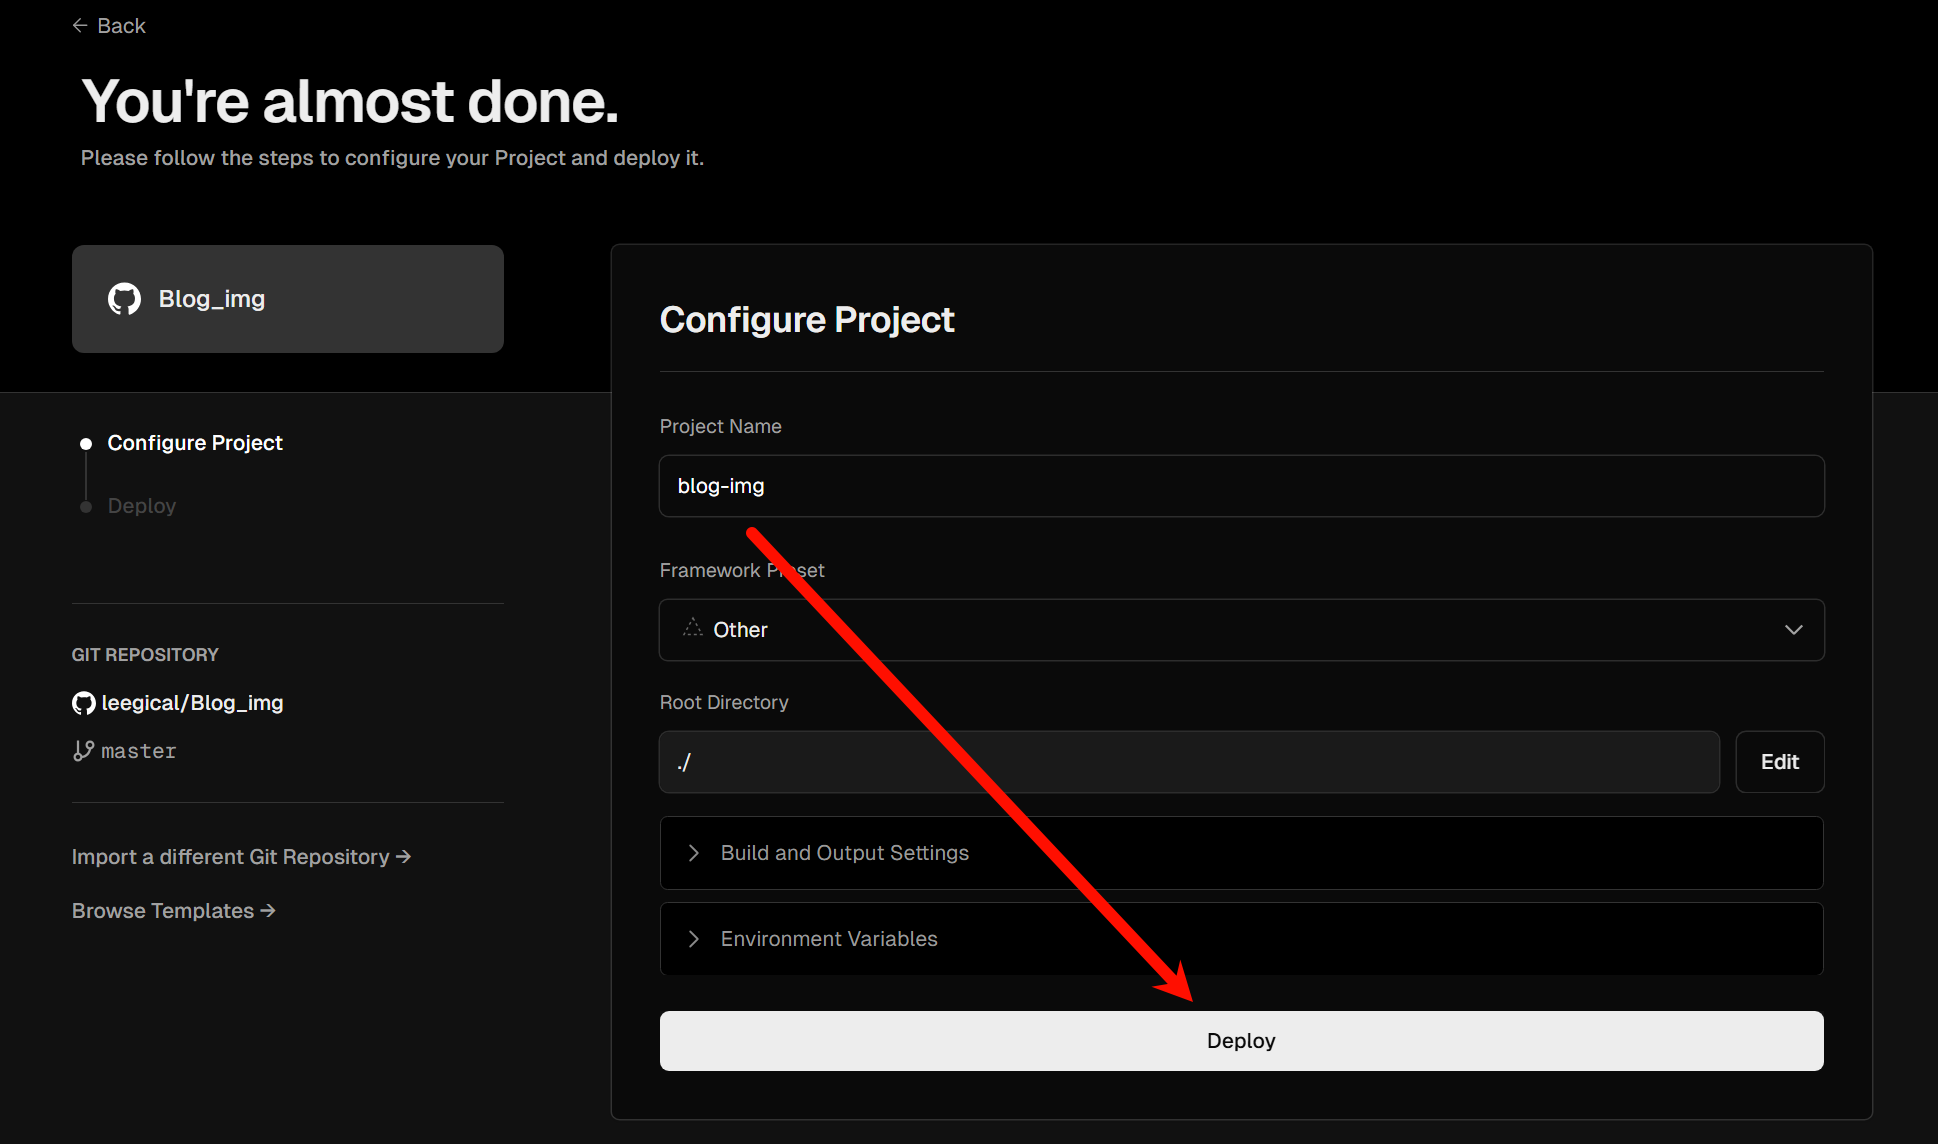
随便改个项目名,其他不用动,点击 Deploy 部署部署图床项目到vercel
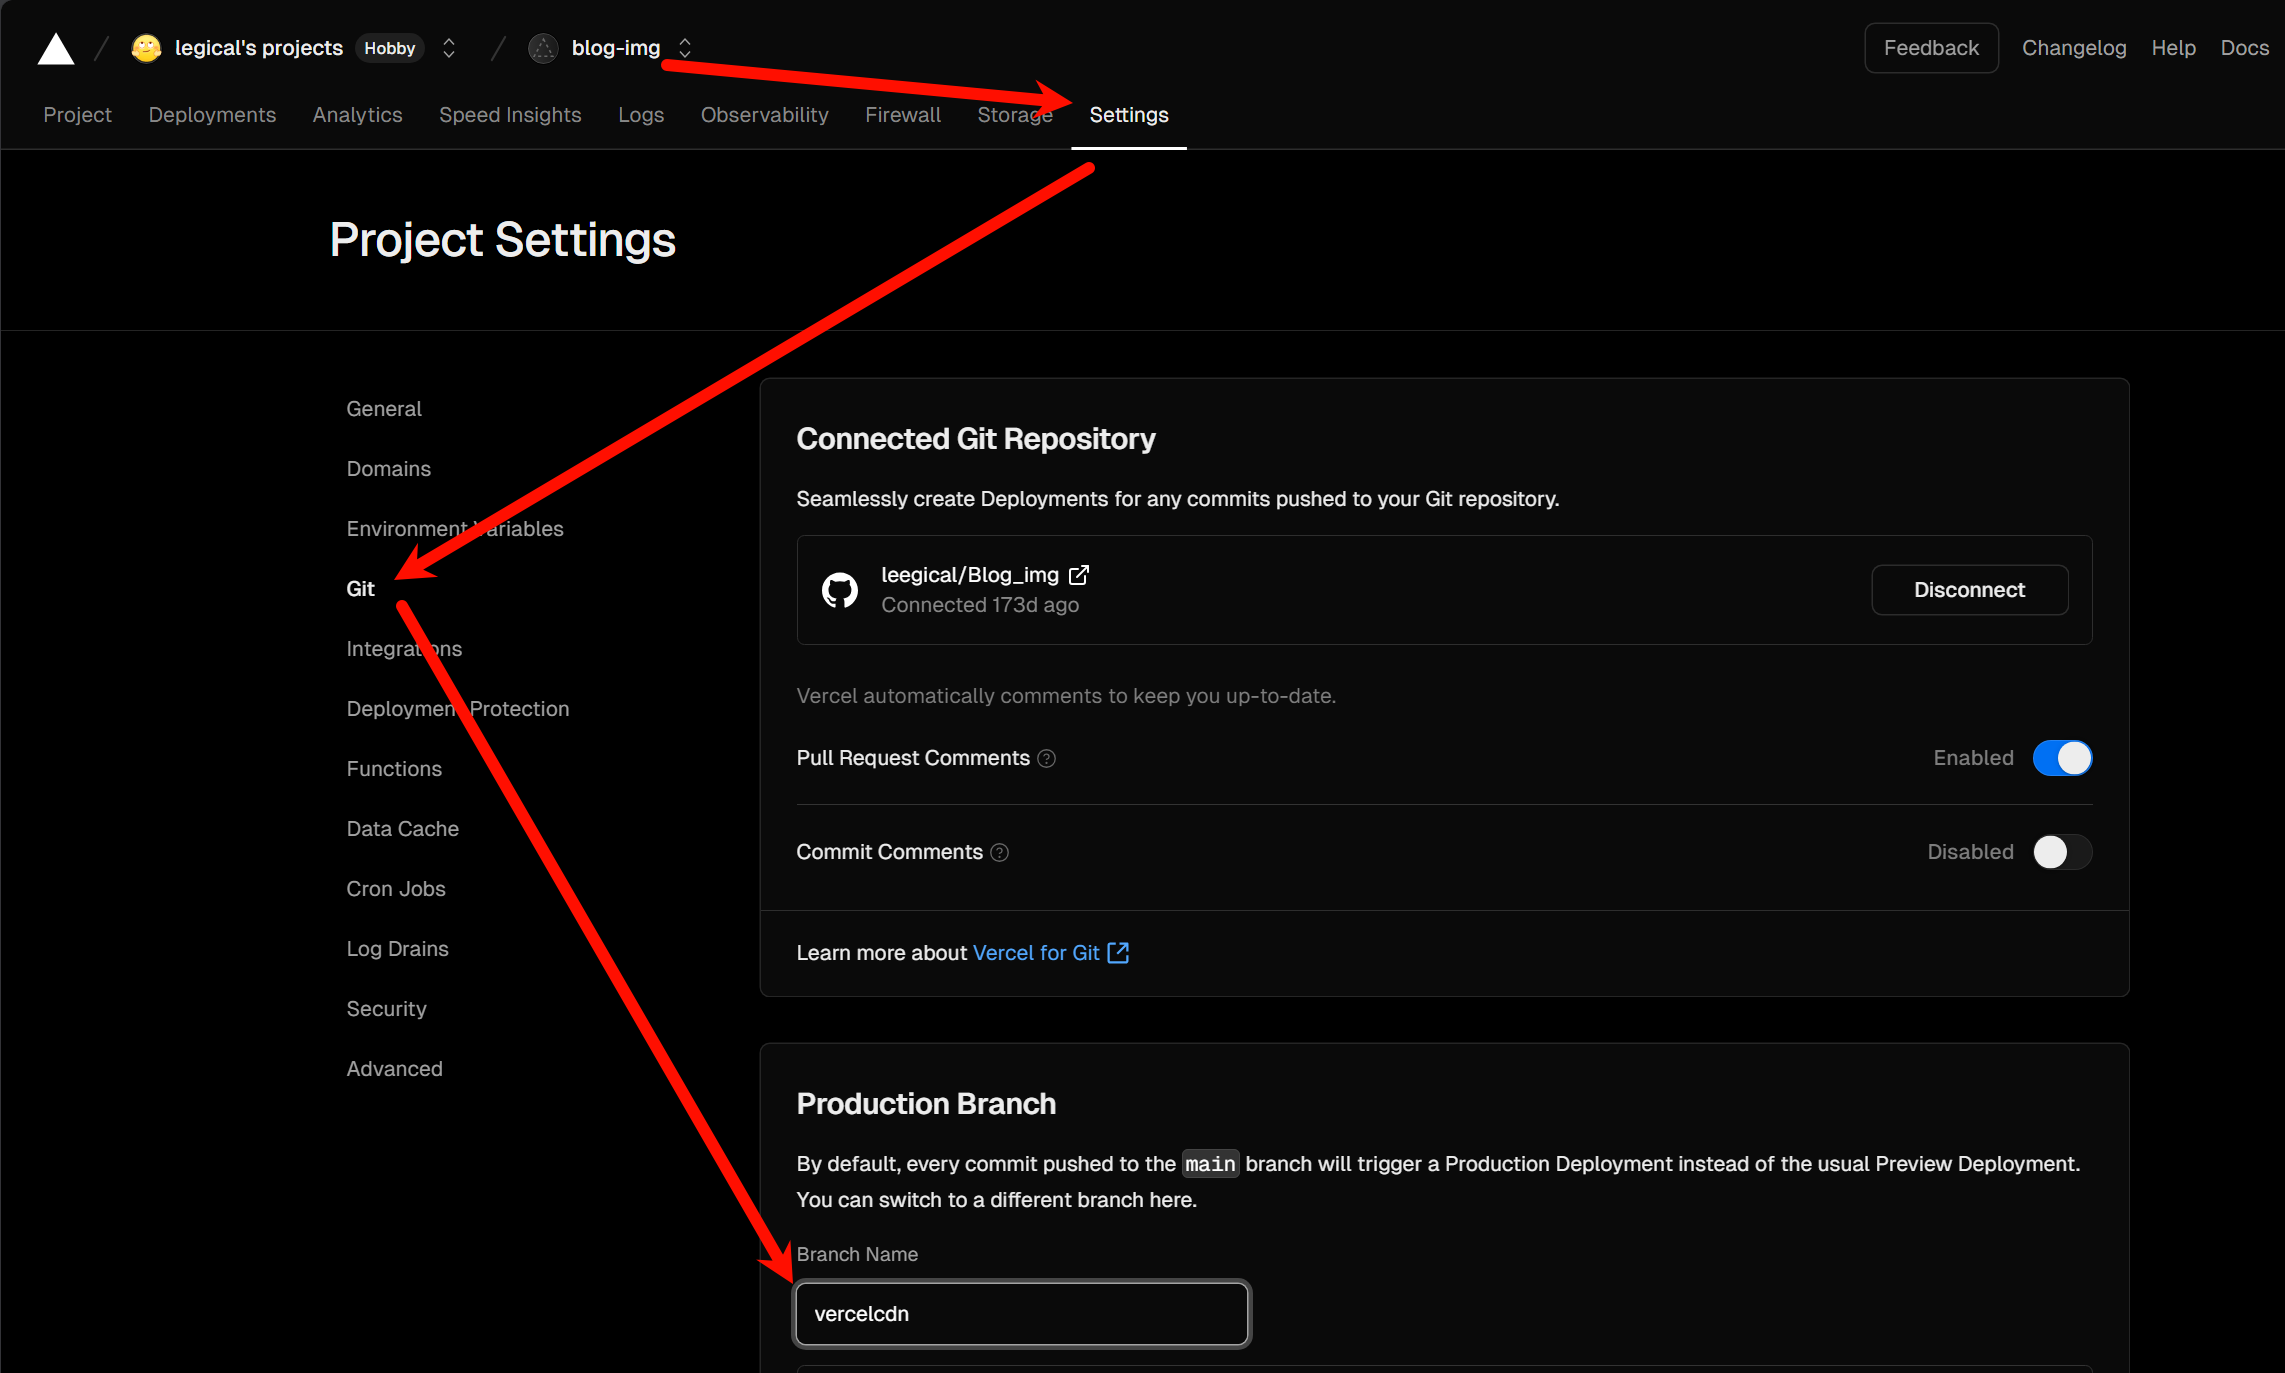
部署成功后,点击项目——设置——Git。将分支更改为上一步新建的分支名 vercelcdn 。这里没有保存按钮,用鼠标随便点一下其他地方就行更改分支
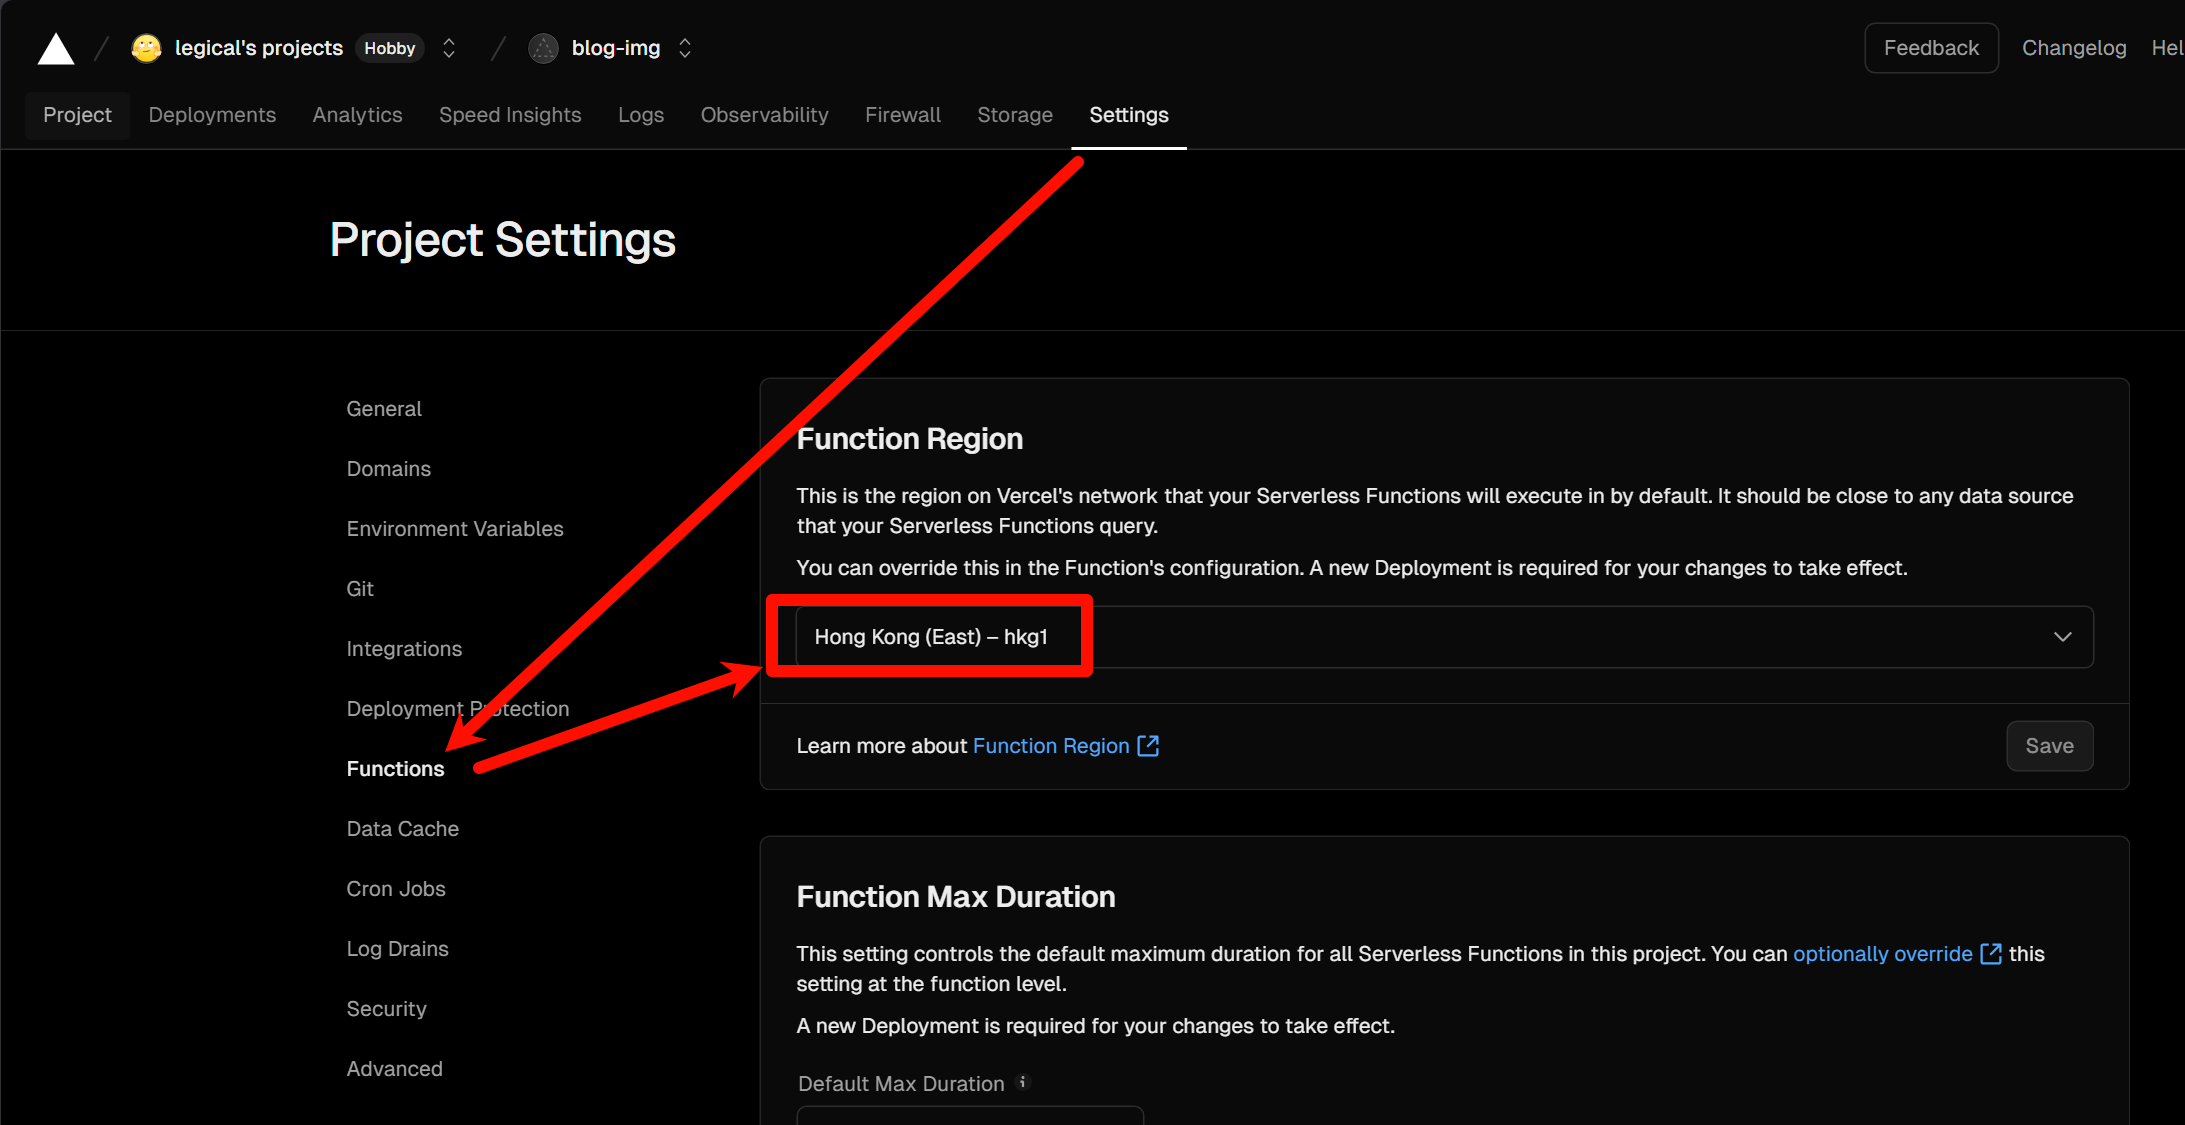
项目——设置——Functions。将地域改成香港(Hong Kong)更改地域为香港
2.3 设置自定义域名
部署成功后,vercel 会自动为你的项目分配 xxx.vercel.app 域名。但这类域名已经被墙,无法用于图床图片链接。因此,你需要为项目设置一个自定义域名。
使用 Vercel CDN:利用 CNAME 负载均衡实现的 Vercel 加速 CDN 可以加速 vercel 访问。
加速原理
Vercel 在大陆周围还有很多节点,其中包含中国台湾、韩国、日本、新加坡等,这些节点的访问延迟在接受范围,且相对香港节点来说带宽更充足。
Vercel 的 Anycast 会自动将节点解析至距离最近的香港服务器,但如果手动解析则太过麻烦。
vercel.cdn.yt-blog.top 经过不断测速(大约消耗了200MB 流量)手动解析,并通过监控检查状态,无法访问时会及时暂停节点。使用时自动解析至附近可用节点,尽可能的选择优质节点。
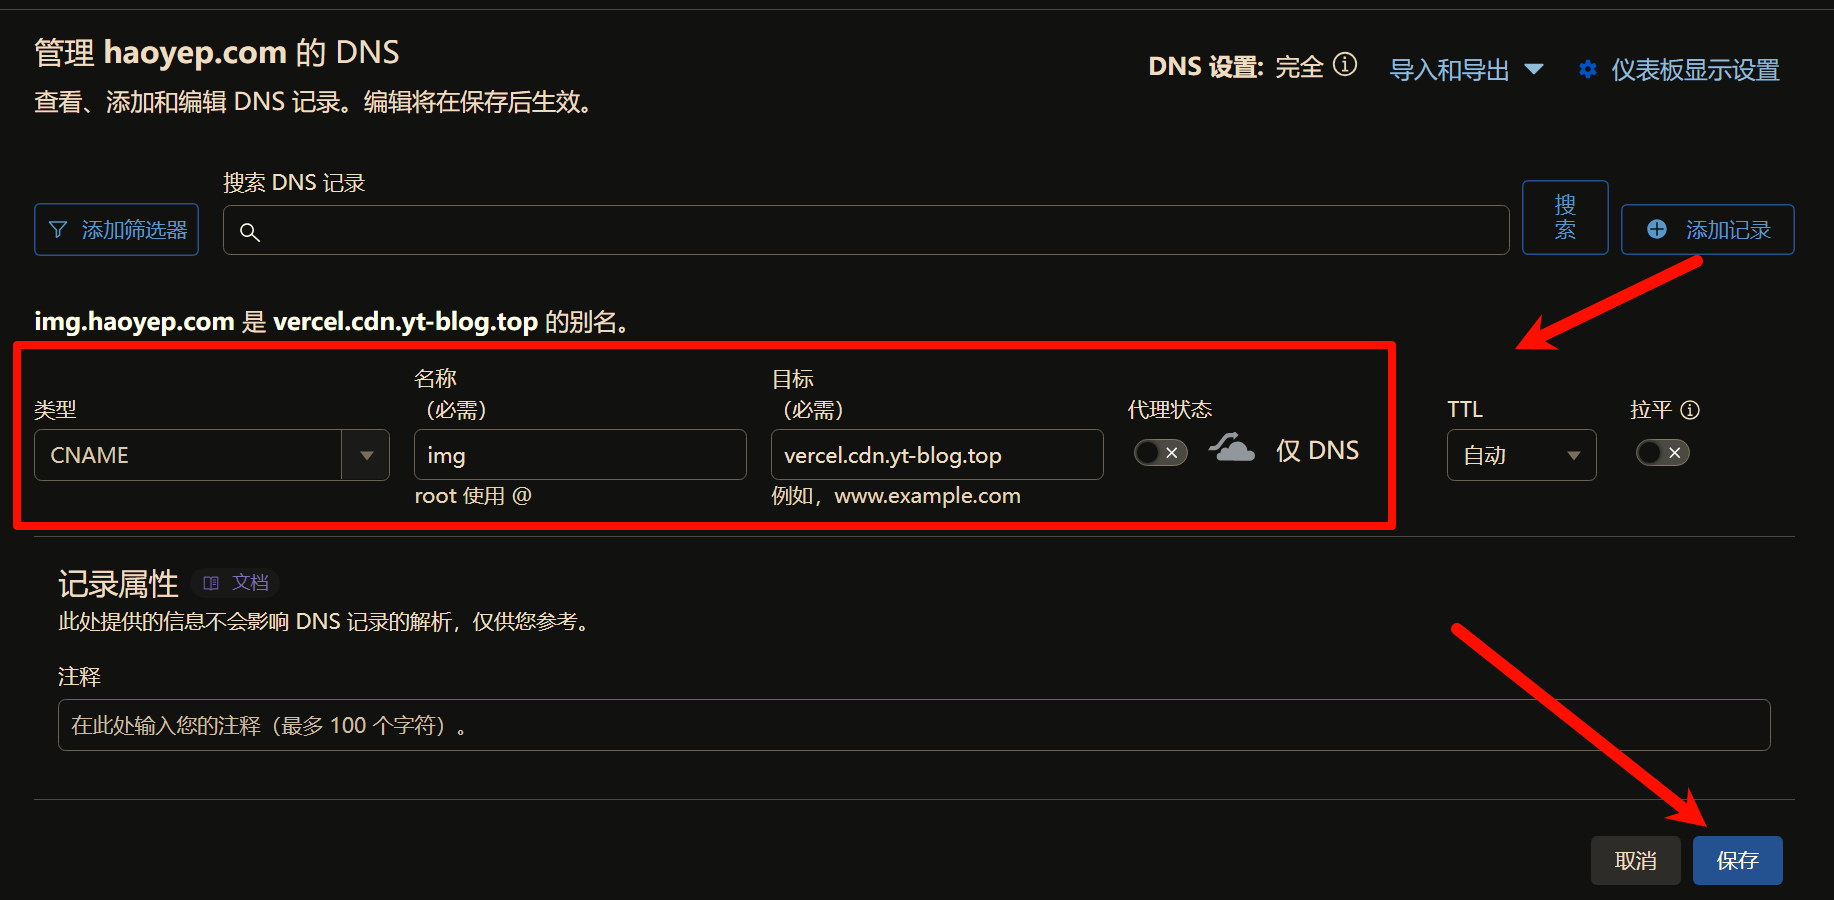
登录 Cloudflare 。假设自定义域名为 img.haoyep.com,添加一条 CNAME 解析记录:
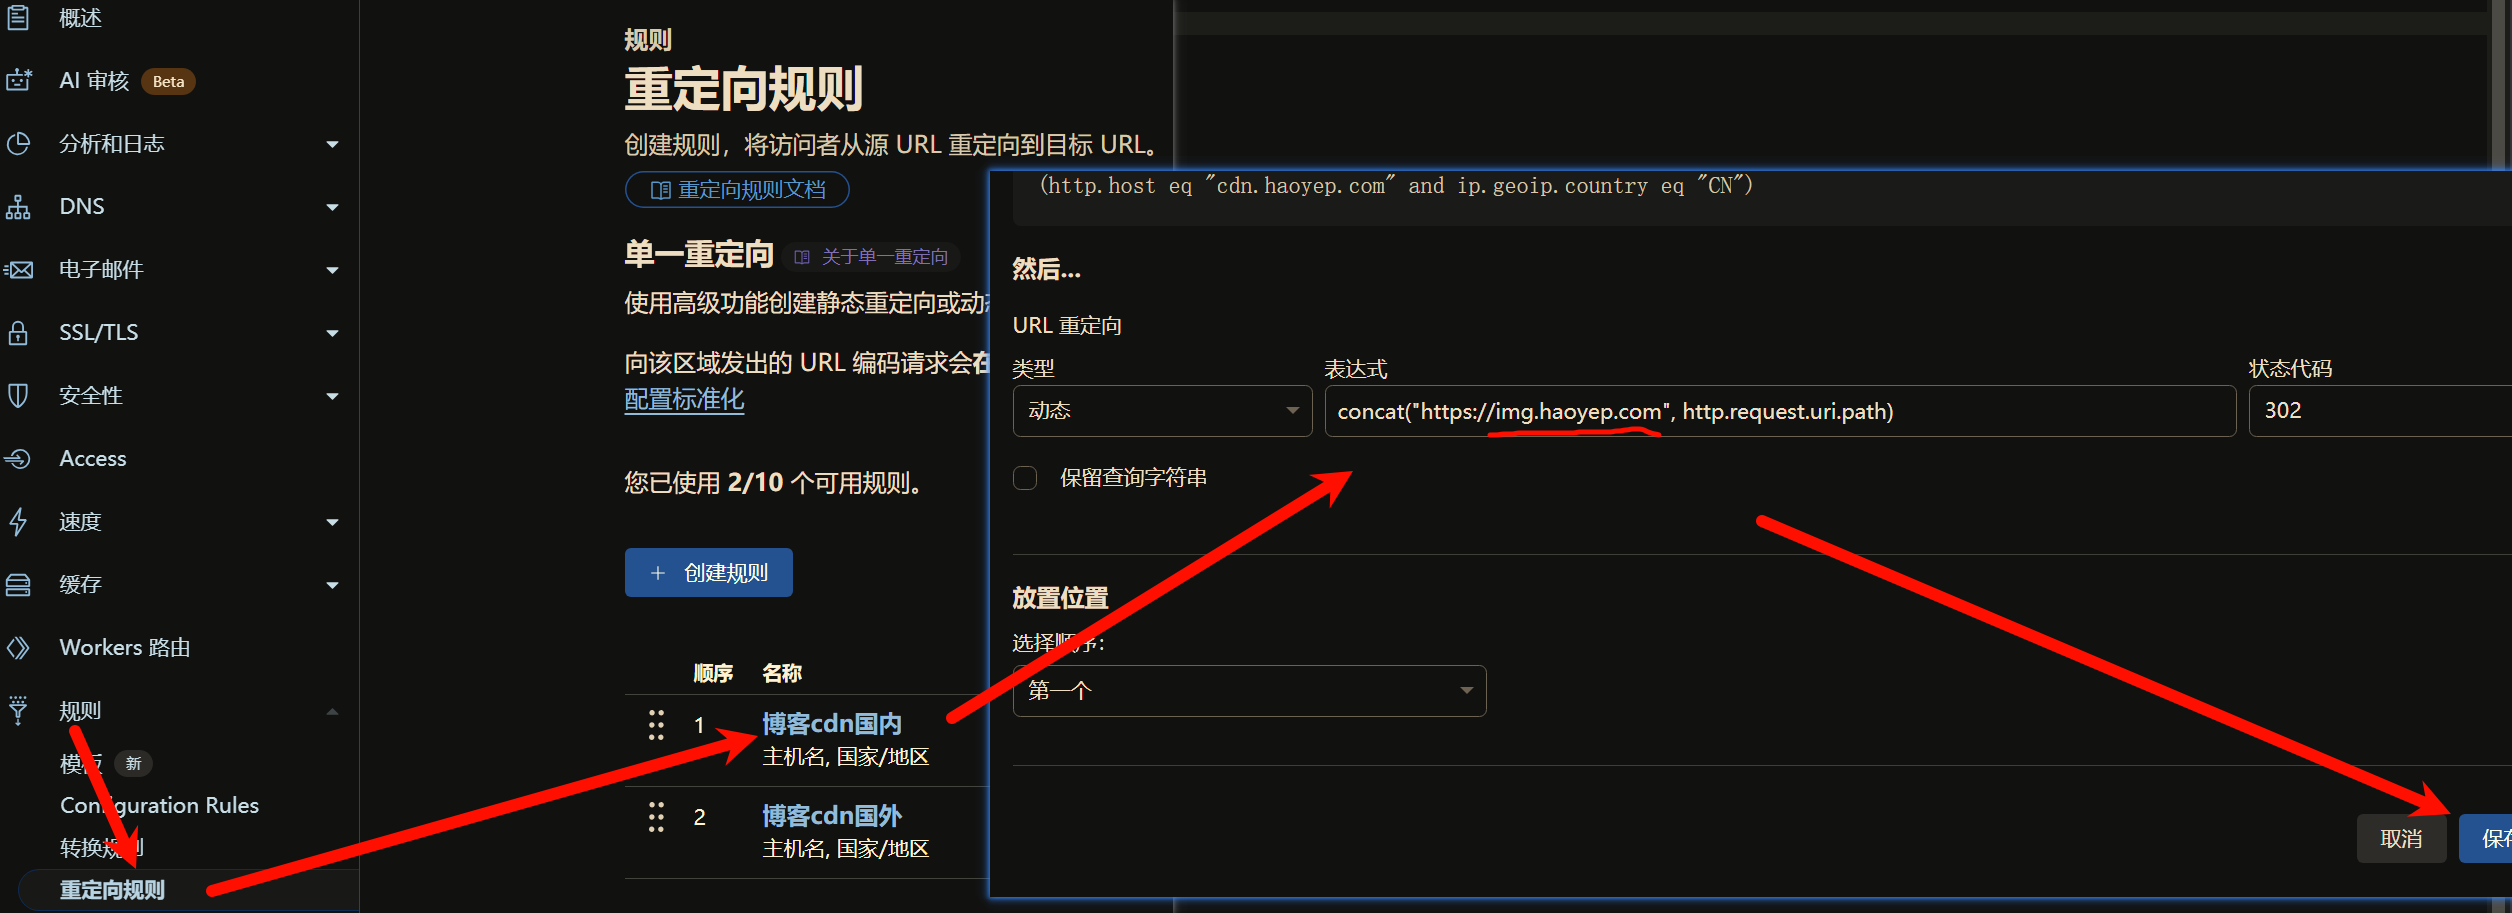
名称:img 目标:vercel.cdn.yt-blog.top 代理状态:仅 DNS添加vercel图床加速域名 规则——重定向规则,将国内的重定向域名改为 img.haoyep.com。更改重定向规则
回到 vercel,项目——设置——Domains。添加自定义域名 img.haoyep.com。稍等片刻,等待 vercel 验证通过。vercel添加自定义域名
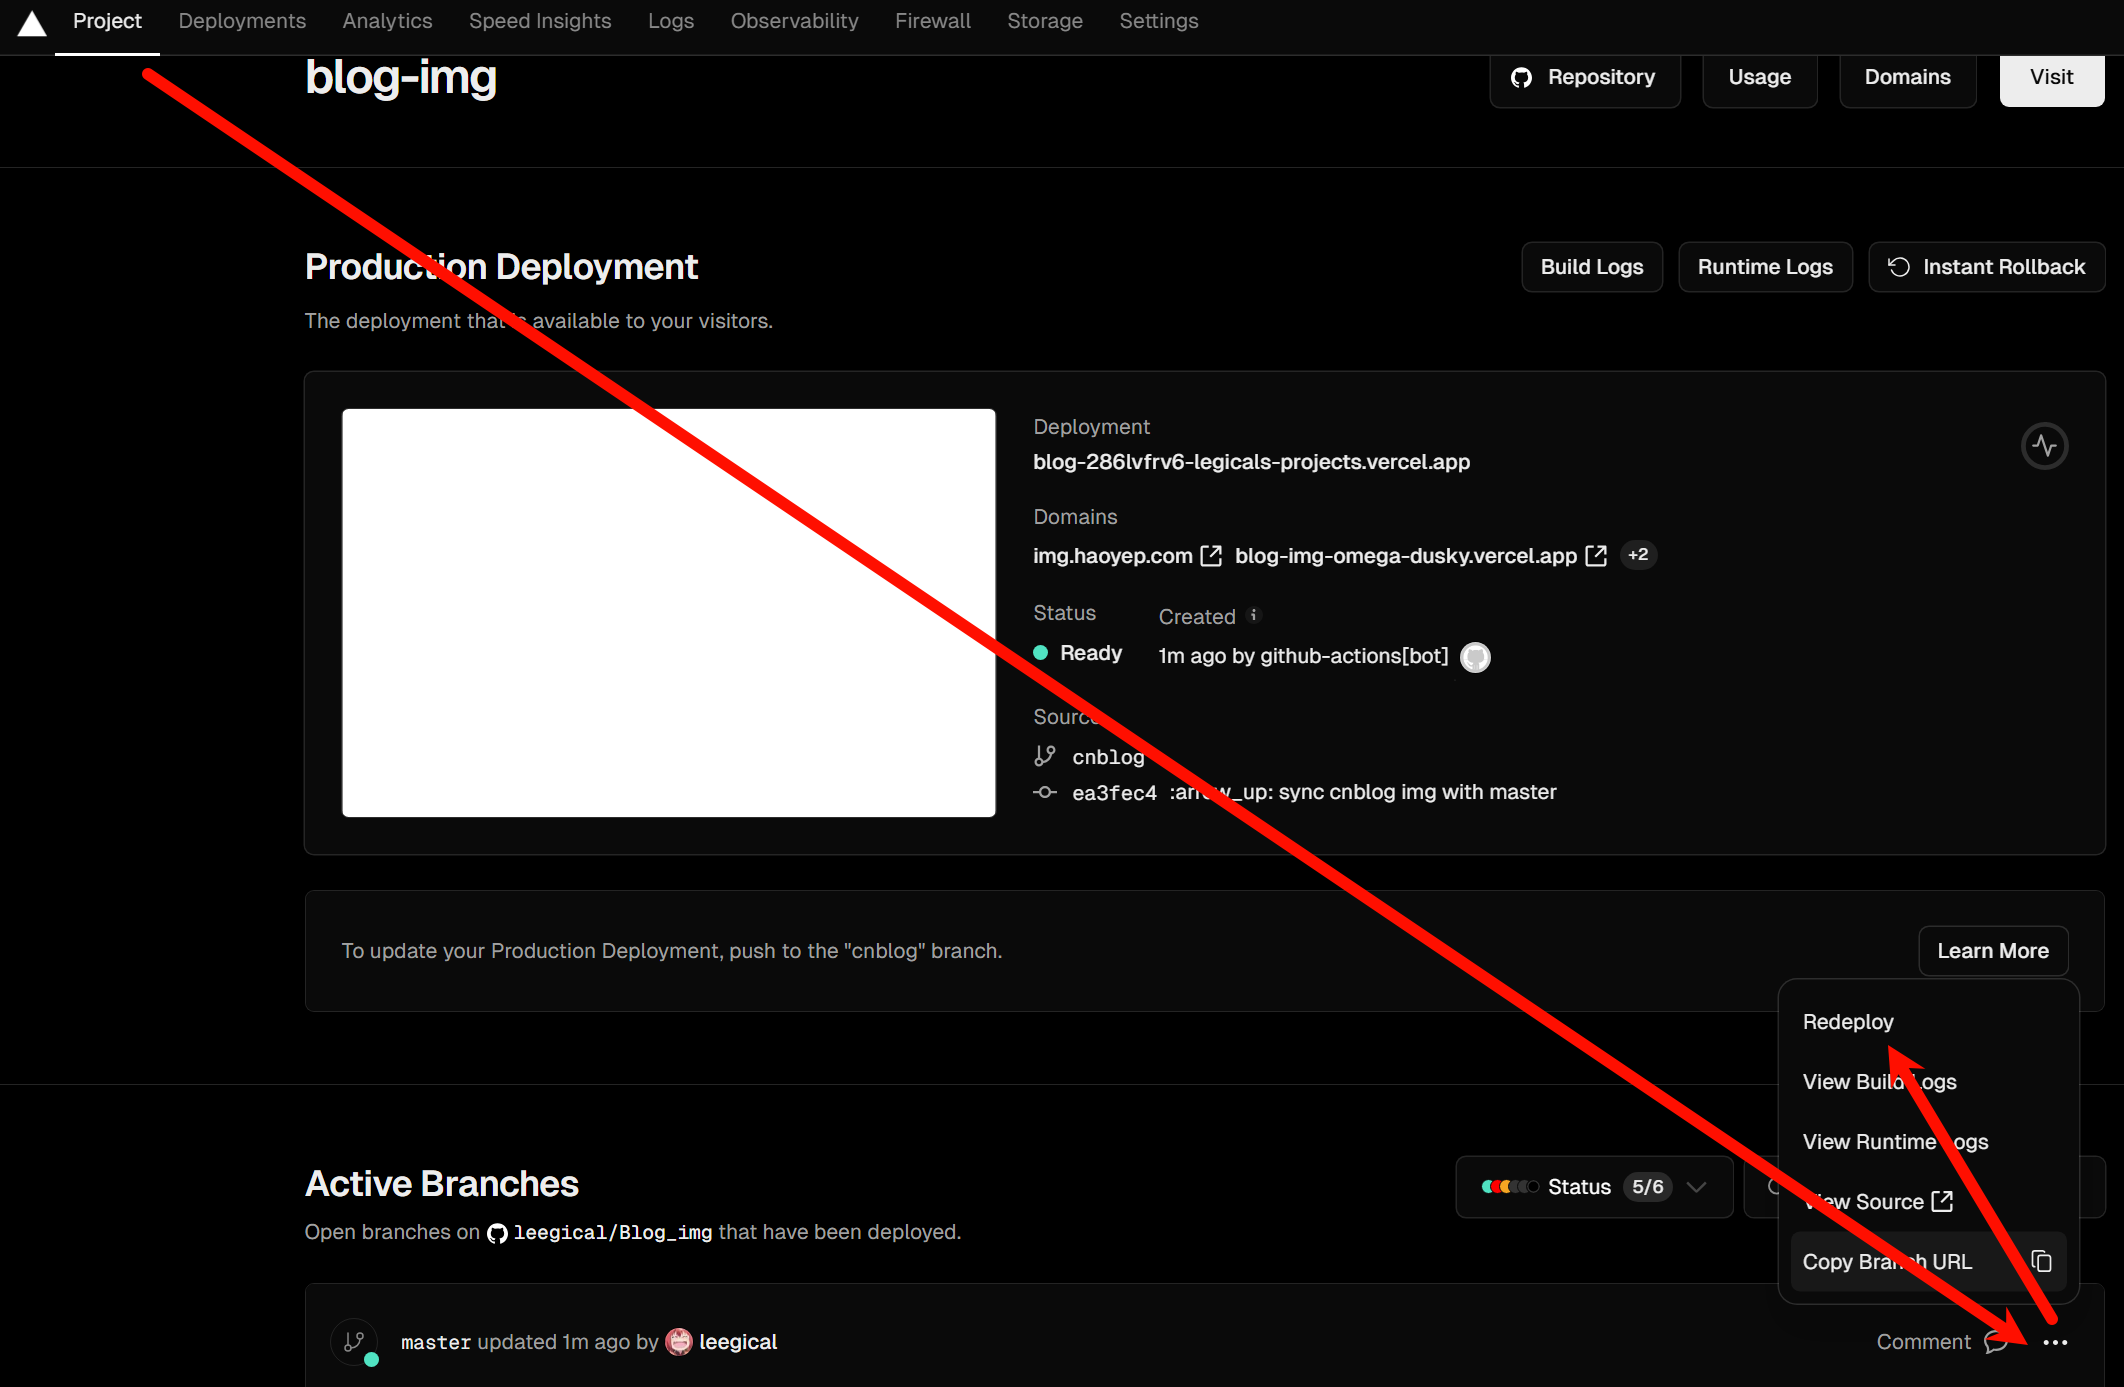
Project——右下角三个点——Redeploy。重新部署一下项目。重新部署项目
3 自动化同步分支
完成上面的设置后,就会自动将国内访问重定向到 vercel 图床项目中。但是如何做到每次上传新图片后,vercelcdn 分支都能自动同步呢?每次手动删除、更新主分支图片实在麻烦,好在可以使用 Github Action 自动化完成操作。
回到主分支,新建 .github/workflows/sync.yml 文件。记得将下面的master改为你自己的主分支名称。
1
2
3
4
git checkout master
mkdir -p .github/workflows
cd .github/workflows
touch sync.yml
复制下面的代码,粘贴并保存到 sync.yml 文件。
记得替换 28-34 行中的邮箱、用户名、仓库名。
 1
 2
 3
 4
 5
 6
 7
 8
 9
10
11
12
13
14
15
16
17
18
19
20
21
22
23
24
25
26
27
28
29
30
31
32
33
34
35
36
37
38
39
40
41
42
43
name : sync
on :
push :
branches :
- master # Set a branch to deploy
pull_request :
branches :
- master # Set a branch to deploy
workflow_dispatch :
schedule :
# Runs everyday at 0:00 AM
- cron : "0 0 * * *"
jobs :
build :
runs-on : ubuntu-latest
permissions : write-all
steps :
- name : Check out repository code
uses : actions/checkout@v4
with :
fetch-depth : 0 # Fetch all history for .GitInfo and .Lastmod
# 记得替换下面的 邮箱、用户名、仓库名
- name : Sync vercelcdn
run : |
git config --global user.email "邮箱"
git config --global user.name "用户名"
git checkout vercelcdn
cd gh/用户名
rm -rf 仓库名
git clone https://github.com/用户名/仓库名.git
cd 仓库名
rm -rf .git
- name : Commit changes
uses : stefanzweifel/git-auto-commit-action@v5
with :
branch : vercelcdn
commit_message: ':arrow_up : sync vercelcdn img with master'
commit_author : 'github-actions[bot] <github-actions[bot]@users.noreply.github.com>'
push_options : '--set-upstream'
以后,每次向 master 分支上传图片,GitHub Action 都会自动将其同步到 vercelcdn 分支。vercel 也会在检测分支有更新后,自动重新构建项目。
4 PicGo
无需设置,按照之前设定好的自定义域名上传图片即可。
不过建议转到 Piclist ,可以使用更多图片预处理功能,如添加水印、裁剪、转换为 webp 格式等。
